|
|
If you like this site, please support us by spreading
the word.
We have made it easy to let your friends know about
us. Just click on the Recommend-It icon below.
|
|
|
Setting up a
Network
|

|
| Ion Petroianu |
|

|
Continued from Page
One
After restart you will be asked to provide a password. Mine are the same as the computer name, but I'm at home
so no need to be paranoid.
Assigning IP addresses
Finally, you should assign IP addresses to each computer. As for the names, each computer should have
its own IP address but they all must have the same "Subnet Mask". For my network I decided to use, following
Microsoft's recommendation, IP addresses starting from 192. 168. 1. 1 and going up by increasing the value of the
last location by one for each computer added and the subnet mask: 255.255.255.0.
To do that you must follow the same procedure as before. Right click on "Network Neighborhood", click
on Properties, stay in configuration tab where you scroll down to "TCP/IP >Your NIC", highlight that
and click on "Properties". A second window will pop up and you should go for the "IP Address"
tab. Check the radio button that reads "Specify an IP address" and type into the spaces provided the
IP address you decided and the subnet mask. My suggestion is to stick with my numbers because those IP addresses
are used only for internal networks.
After that click OK and again OK and Windows will ask you to restart. You must restart each computer for the changes
to take effect.
Enabling file and printer sharing
Last step is to enable file sharing from within Explorer. Open Explorer (Windows Explorer) and right
click on a file, a folder or a drive you want to share. In the menu there is an option called "Sharing".
Click on it and make the decisions you need as for what you want to allow (reading, full access, etc.). Click OK
and you are done. You should do the same for the printer(s) on the systems connected direct to the printers. Don't
forget to share the printers!
You can share files and printers now. See that for yourself by double clicking on the "Network Neighborhood"
icon.
Note: To see your computers on the network you should have at least one file
shared on each.
The printer's driver has to be installed on each computer. The difference is when you install it on the computers
that are not connected directly to the printer. For that, when you add your printer you should go for the "Network
Printer" option and browse for the printer you want to add.
Important: Not all printers are able to handle that. I know for sure that the
Lexmark 1000 is not able to print correctly when working on a network. Second point to keep in mind is that you
must have the computer directly attached to the printer ON in order to be able to print from any other computer
in your network.
Connecting to the Internet
When everything is done and your brand new network is working you have only one thing left in your agenda.
Connecting to the Internet.
My recommendation is to go for proxy server software if you have a slow internet connection (modem) and a NAT (network
address translation) software package if your connection is fast. The proxy server usually comes with the capability
of caching the web pages you visit and you will enjoy better performances from your network in terms of surfing
speed. On the other hand NAT software is easier to install and configure and allows the use of any internet application.
Other options
All the installation, except for the way you run the cables, is the same if you use CAT5 cables and
a HUB. In that case you should run each cable, from each computer, to the HUB. If you want only a two-computer
network a "crossover" cable connecting them directly from a NIC to the other is everything you need,
no HUB. For how to make a "crossover" cable see Figure 2:
|
|
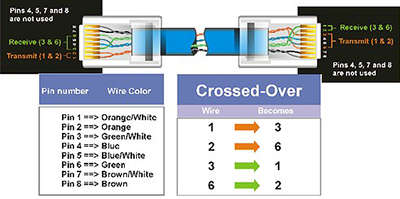
Figure 2
|
|
|
Back to Top
|
|

