|
|
If you like this site, please support us by spreading
the word.
We have made it easy to let your friends know about
us. Just click on the Recommend-It icon below.
|
|
 xAlan
Bryer xAlan
Bryer |

|
| Building your own PC |
|
Page One
| Page Two
| Page Three
| Page Four
| Page Five
|
|
 |
Part Four (a):
Putting your machine together |
|
|
|
Safety First:
- Whenever working on your PC make sure it is switched off at the mains.
- Be careful of sharp edges on parts of the case.
- Take antistatic precautions. Many parts are highly sensitive
to static discharge.
- Always have your mind on the work that you are doing.
|
|
Disclaimer
Neither I nor Romulus 2 can be held responsible
for any mishaps or problems which may arise by following the instructions given below. See our Legal Page.
Please exercise your own caution and common
sense.
|
|
|
Tools:
- 1x Small posi driver.
- 1x Medium posi driver.
- Cable ties.
- Thermal compound.
- Patience.
|
|
Workplace:
Clean surroundings should be available when building a PC. The last thing you would want
is to be looking for a screw or nut amongst a mess.
|
|
| Please make sure you have the tools listed above and have read the safety tips. Assuming you have taken your components
out of their boxes, we will begin. |
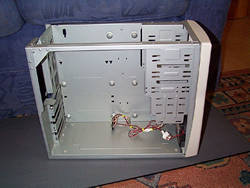
Starting
On the back of your case are four (sometimes less or more) screws. Undo these and take the cover off the case.
Then take the four screws out of the power supply and remove this; it makes for easier access while building you
PC. On the side of the open case will be a plate. This is where the motherboard is situated when finished. Somewhere
on the left or right side of this will be 1 or 2 screws, remove these and the side should come away. |
|
Then remove the pressed metal plates where you are going to place your FDD and CD-ROM drives. Also remove the front
plastic covers where these two items are going to go.
Now you are ready to put your machine together. Offer the motherboard over the side and see where the holes line
up for the screws to hold the motherboard in place. With the case you should have received some small red/black
round fabric or paper washers. Place one of these on each hole and carefully place the motherboard on the side
and fix with the screws supplied. Remember not to over tighten these as they can crack the layers within the motherboard
and render it useless. |
|
Motherboards & processors
Super Socket 7 & FC-PPGA Motherboards processor insertion instructions.
AMD K5 & 6 series. AMD Duron series. And Cyrix series processors.
Now carefully insert you processor into its socket if its A, SS7 or B, FC-PPGA.
These use a ZIF (Zero Insertion Force) socket and are marked on one corner to line up with the appropriate marks
on the processor. Lift up the arm on the side of the socket and place your CPU into the holes on the socket. It
should just drop into place. If not, press down very gently and lower the arm back into its down position.
The processor should be inserted without any effort and sit flat on the socket.
Now this has been done, it's time to attach your heatsink/fan combo. Spread a thin layer of Silicon thermal compound
onto the small square centre piece on the top of the CPU, then place the heatsink onto the top of the CPU, tilt
back and attach one side with one of the clips, level it and press the final clip on. Your heatsink is now securely
fitted. There should be close to the CPU a 2 or 3 pin fan header. Connect the two or three wires from the fan to
this (2 pin is for fan only, 3 pin reports fan speed to the motherboard's BIOS for monitoring).
Intel Slot 1 & AMD Slot A Boards.
Intel PII & PIII series. AMD Athlon series processors.
These processors fit into a slot on the motherboard and are held there by two
upright supports. Again, spread a thin layer of Silicon thermal compound onto the processor cap. Place the heatsink
onto the processor and attach from the opposite side with the clips provided. Then push the CPU into the slot,
making sure you insert the CPU the right way round and then make sure the clips are in place. Dependent on the
brand of motherboard you are using, you will have to refer to the manual to set the jumpers or dipswitchs to determine
the CPU speed (i.e. FSB * Multiplier = CPU speed and also the default voltage that your CPU runs at). This you
must do verbatim as it is quite easy to damage either your CPU, motherboard or both. This applies to all
motherboards and any CPU configurations. |
|
|
| |
|
|
| Next: Continued |
|
| |
|
|
Back to Top
|
| |
|
|

