|
|
If you like this site, please support us by spreading
the word.
We have made it easy to let your friends know about
us. Just click on the Recommend-It icon below.
|
|
 xAlan
Bryer xAlan
Bryer |

|
| Building your own PC |
|
Page One
| Page Two
| Page Three
| Page Four
| Page Five
|
|
|
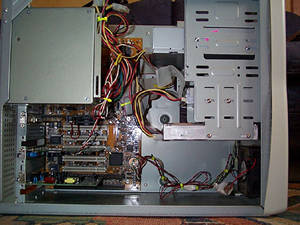
Adding the drives
Now it's time for your HDD, FDD and CD-ROM drives. First slide the HDD in below or above where you will be placing
your FDD (depending on the type of case you have bought). Secure it with four small screws. Then slide in the FDD
drive and CD-ROM drive from the front of the case and secure with the screws provided with the case. |

|
|
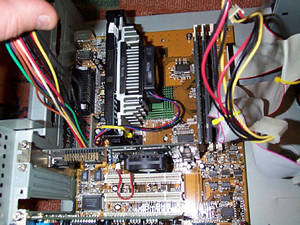
Controller cables & power supply
Now you're ready for connecting the controller cables. These send the data streams from the various drives to the
motherboard. The No1 pin on the cable is the red dashed one and the right way round is to have it next to the power
supply on the drives, i.e. where you connect the power supply for the drive. The flat controller cable fits in
its socket with the red stripe next to the power supply. |
| Most motherboards will have a No1 silkscreened (printed) next to the IDE slot where the cable goes. This corresponds
to the red stripe on the cable. The HDD is always connected to IDE1 as the master and the CD-ROM drive is best
put on IDE2 channel as master so your CD-ROM drive doesnt slow down the HDD. If you prefer, the two can be daisy-chained
with the HDD as master and the CD-ROM drive as slave. |
|
| When installing a CD-ROM drive you have the option of adding an audio cable, which goes from the connection on
the far side of the CD-ROM away from the power supply to the AUX or CD connecter on the soundcard. The FDD is connected
in the same way but the red stripe is away from the power supply to the drive and is the smallest cable of the
two. Using the cable ties tidy up the cables and make sure they are away from any fans. |
|
|
Now it's time to put your power supply back and connect the power cables to the HDD, FDD & CD-ROM drives, not
forgetting the power supply to the motherboard. The red cable on the power supplies goes next to the red stripe
on each of the drives and can only be inserted one way. And you can only connect the supply for the motherboard
one way also. |
| Finally, it is time to connect the leads for your cases operations, i.e. the power on button, HDD LED, power LED
and reset button. For this you will have to refer to the manual for you motherboard; these are clearly explained
and are straight forward. |
|
|
Make sure all connections are firmly in place and that the inside of your machine is tidy. Now put the cover back
on your case. |
Now you are ready for the first boot of the machine, running FDISK and the installation of your chosen operating
system.
Congratulations! You've built your PC. |
|
| |
|
|
| |
|
|
Back to Top
|
| |
|
|

